How to migrate an Azure virtual machine from one tenant to another
by Zach Urrutia on December 15, 2021
System administrators are often tasked with migrating existing virtual machines from one of their tenants to another. At first glance, this task can appear to be daunting. Luckily, Microsoft offers a free tool called Azure Storage Explorer which offers the ability to log into multiple Azure tenants to monitor and manage resources within your environment(s). This article will walk through how to migrate an Azure virtual machine from one tenant to another.
1. Selecting your Azure resource
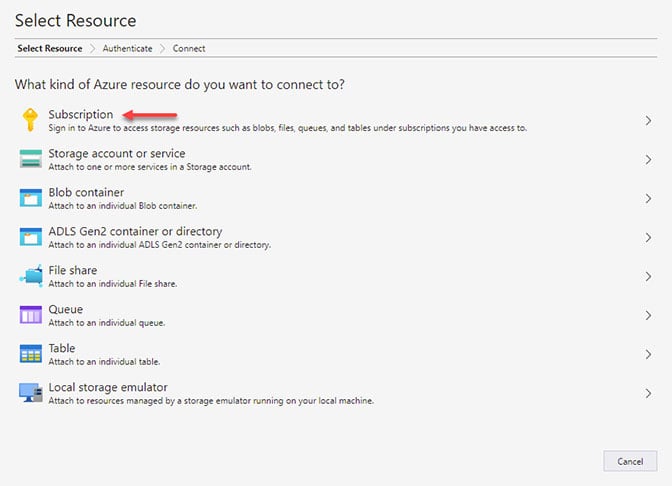
After installing and opening Azure Resource Explorer you will be asked which Azure resource you are connecting to. For virtual machine (VM) migrations from one tenant to another, you should select Subscription. This will allow you to view and manage your virtual disks that make up the VM. Sign into the Azure tenant you will be moving the VM out of; the source.
2. Sign into the Azure tenant
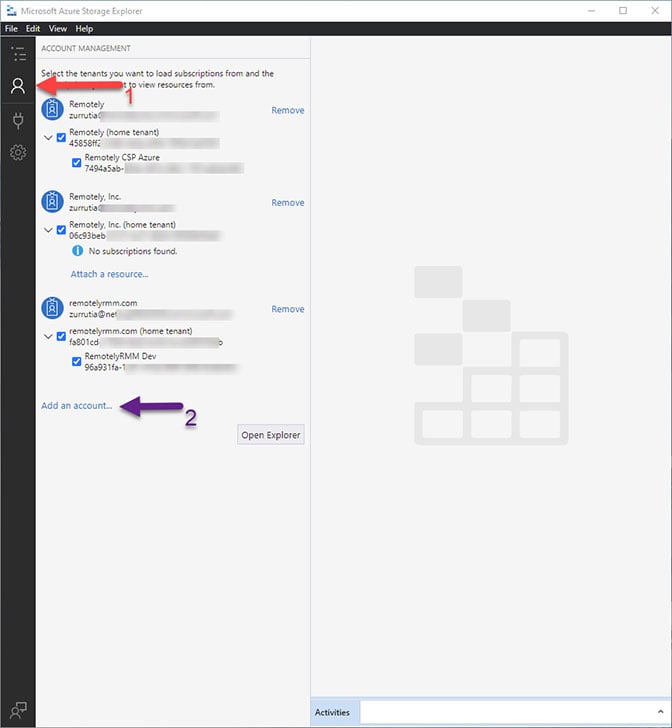
Next, sign into the Azure tenant you will be moving the VM into; the target. To sign into another subscription:
- Select the User icon in the left toolbar
- Select Add an account
To add additional tenants, repeat the actions listed above. The screenshot below shows 3 separate Azure accounts being added to the Azure Storage Explorer client.
3. Shut down the VM being migrated
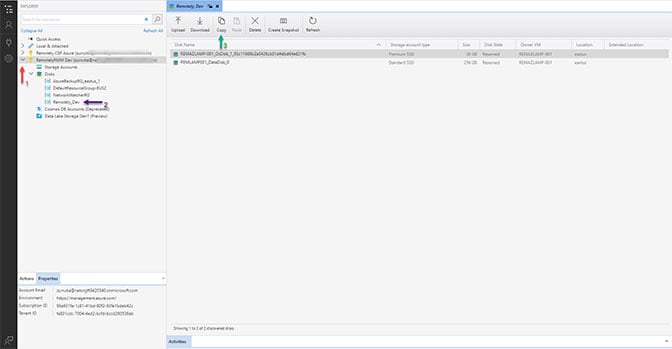
It is important that the VM you are migrating is completely shut down before proceeding with the migration process. Once the VM is shut down from the Azure portal, locate the disk that is associated with the VM being moved out of the tenant. This disk will be listed under the Disks dropdown. You will then need to locate which Resource Group the disk is located in. In the example below you will see a VM called REMAZLAMP-001 located inside the Remotely_Dev Resource Group within the RemotelyRMMDev tenant. We will be migrating this VM out of the current tenant and into another tenant that we are signed into the Storage Explorer with.
4. Copy and pasting the VM disk
Once the context is on the source VM disk, you will be prompted with the following options:
- Upload
- Download
- Copy
- Paste
- Create a snapshot
For migrating this VM disk, ensure that the source disk is highlighted, the select and choose the Copy button. In this exercise, the VM has two disks - an OS disk and a data disk. We will need to perform the following steps twice - once for each disk.
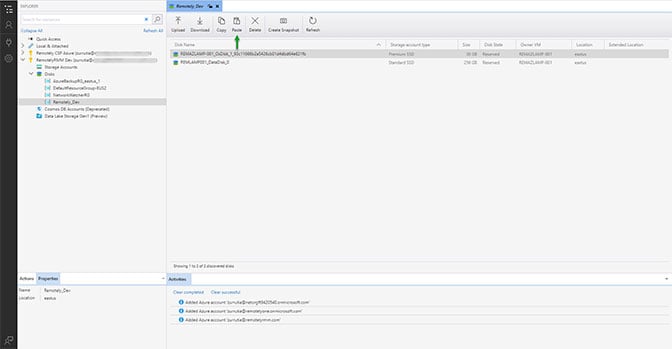
When the source disk is copied, navigate to the target Resource Group located inside the target tenant. You will then click the Paste button to paste the disk into the new target Resource Group.
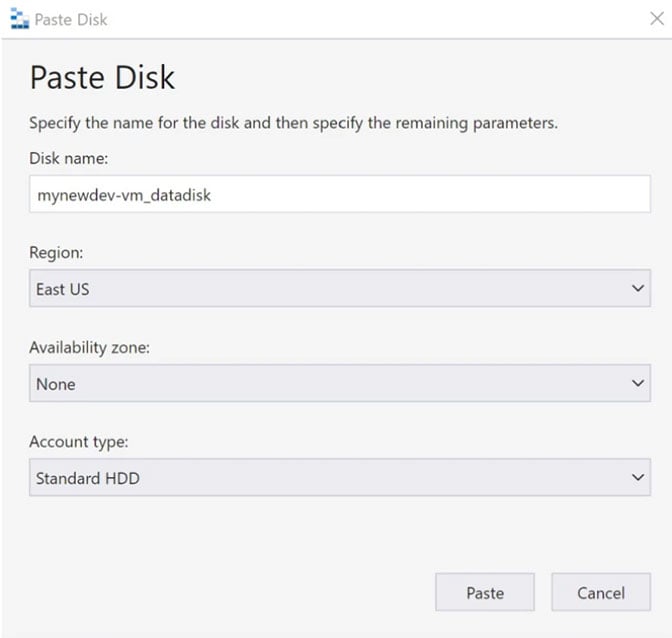
Once pasted, you will be prompted to provide settings information for the pasted VM disk. Fill out the:
- Disk name
- Region
- Availability zone
- Account type
The Activities panel at the bottom can be used to track the events within the Storage Explorer. When the copy and paste is complete, the new disk will appear in the target location.
5. Create the new VM
The final step is to create the new VM out of the VM disk(s) that you copied to your new tenant. To do so, log into your Azure portal wit the account that is associated with your target tenant.
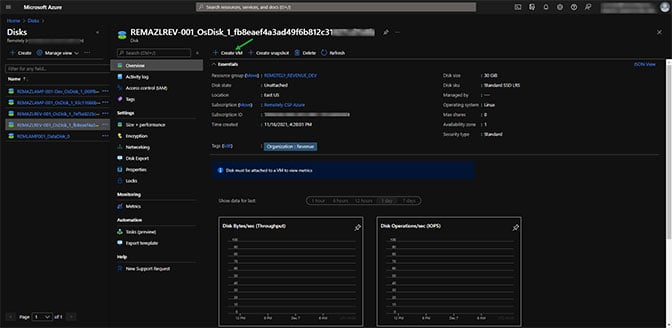
Next, Search for Disks and select the disk you copied over. In this example, because the VM had an OS disk and a data disk, we are first selecting the 30GB OS disk, then clicking Create VM to ensure that the new VM uses that disk for the OS.
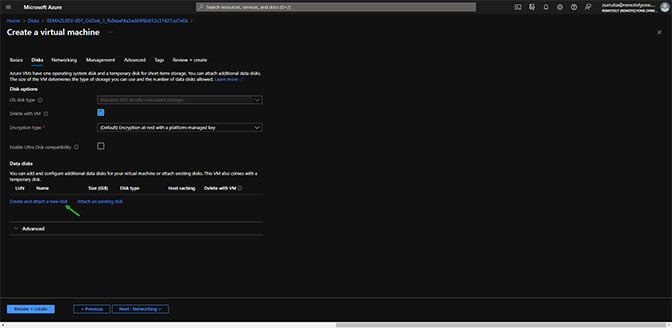
In the screenshot below, we have the option to attach the data disk of 256GB to the new VM when configuring the settings for the VM.
Once all VM settings have been entered you can select Review and Create to complete the creation of the new VM. Congratulations, you have now successfully migrated an Azure VM from one tenant to another.
Note: You will not get the option to create an admin account when creating the new VM if one has already been created before the migration. The existing admin account is stored in the disk and will be detected when the new VM is created after the migration.
Built on Azure. Built for Azure.
- Cyber Security (16)
- Security (15)
- Azure (10)
- Cyberattack (10)
- IT Operations Management (10)
- Remote Monitoring and Management (10)
- AIP (9)
- IT Strategy (9)
- Remote Work (9)
- Asset Management (7)
- IT Operations (6)
- Asset Inventory (5)
- Reliability (5)
- Remotely Interesting (5)
- Risk Management Framework (5)
- Azure Migration (4)
- Microsoft Secure Score (4)
- Office 365 (4)
- Security Risk Index (4)
- Customer Success (3)
- GRC (3)
- Risk Dashboard (3)
- Support (3)
- Powershell (2)
- First Steps (1)
- Migrate (1)
- System Requirements (1)
- Virtual Machine (1)
- Zero Trust (1)
- August 1, 2023 (1)
- July 1, 2023 (2)
- May 1, 2023 (1)
- March 1, 2023 (2)
- February 1, 2023 (1)
- January 1, 2023 (1)
- December 1, 2022 (2)
- November 1, 2022 (2)
- October 1, 2022 (1)
- September 1, 2022 (2)
- August 1, 2022 (1)
- July 1, 2022 (1)
- June 1, 2022 (2)
- May 1, 2022 (4)
- April 1, 2022 (3)
- March 1, 2022 (2)
- February 1, 2022 (2)
- January 1, 2022 (1)
- December 1, 2021 (4)
- November 1, 2021 (1)
- October 1, 2021 (1)
.png?width=50&height=50&name=Untitled%20(50%20%C3%97%2050%20px).png)

No Comments Yet
Let us know what you think